|
Support Article: Document Imaging
with WinAA
In
order to start using the document imaging portion of the WinAA software there are
a few items that you will need to check. First after making sure that the scanner
is Twain compatible, you will need to install your scanner. You may need to follow
the instructions provided with the scanner for this step. One word of advice that
we have for installing the scanning software, do not load any third party software
that might come with the scanner. Imaging for Windows will also need to be installed
on the scanning workstation and any workstations that you plan on viewing the scanned
documents. Imaging for Windows is a component that comes with Windows 95/98/NT so
in order to install this software you will need your operating system CD. Insert
the CD and go to Add/Remove Programs under the Control Panel. Click on the Windows
Setup Tab and select Accessories and click Details. Here you should see where to
select Imaging if it is not already installed.
The next thing that you will need to do is configure a folder in which to store
your images. In order to do this you will want to create a folder on your server
that is accessible to all of the workstations. After you have created this folder
you have to link it as the image storage path for WinAA. There are three methods
that you can choose to do this. The first one will only work if you are using the
same network drive letter on all of the workstations. This method is to use the
direct path. An example of this would be F:\IMAGES\. One method that you can use
if you are not using the same network drive letter on all of your workstations and
if you have a dedicated server is to share your imaging folder with read/write permissions
and then map each workstation to this folder with the same unused drive letter.
This example would be I:\ if you chose to use the letter I. The third method that
you can use also involves using a path. Instead of the old MSDOS type path you can
use a windows UNC path. This is probably the best choice since it is more uniform.
To use this method, simply include the shared server, drive and folder names. If
your shared server has the name Server and you wanted to use the folder Images on
the drive DrvC, the path would show as \\Server\DrvC\Images\.
Once you have determined which method you would like to use, enter the path into
the WinAA Agency Information screen. Once you are finished with the configuration
you are ready to begin scanning your first image. You may want to test your scanner
to make sure that it is working correctly with its Twain drivers before attempting
to scan in WinAA. The easiest way to do this is to scan a document from Imaging
for Windows. This software strictly uses the Twain drivers. Once you have determined
that it is working from this software you will want to go into WinAA to perform
your first scan.
Once you have WinAA opened, go to Customer Folders from the main menu. Here you
will select the customer that you will scan the image for. Open the customer folder
and click on the images tab.
Next you will want to click on the Add button. You will see a pop-up window similar
to the one pictured below.
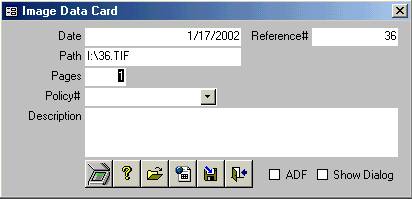
On this screen you will see the image storage path, reference number and today's
date. The number of pages to be scanned, policy number and description will need
to be entered. If your scanner has an automatic document feeder you will need to
place a check beside ADF. Once this information has been filled out, click the scanner
button and the scanners TWAIN software should appear. From here you will need to
follow the instructions that came with your scanning software. Once the documents
are scanned the scanner software should close and you will see and entry under images
for that document. If you click on view you will see what was just scanned.
Additional Tips: Make sure that smallest file size is selected under Imaging
for Windows. This is found under Tools in Scan Options. When scanning regular text-only
documents make sure that the scanner is set to black and white instead of color.
This will help decrease the file size and also allow for faster scanning speeds.
Written by: Cale Parrish
Back
|
